
Although heat transfer printing began in ancient China, the textile industry only incorporated this form of printing in the 60s and 70s to cater to the ever-increasing demand for mass-produced fabrics, which saw the development of heat-sensitive inks and films during the same period. Consumers these days have a voracious appetite for better quality designs, and so they should. Meanwhile, industry professionals swear by the effectiveness and practicality of this form of print design.
But to fully understand why the heat printing process became such a success, we must first understand how a heat press machine functions, its capabilities, and how you can leverage its full potential. This comprehensive guide aims to do just that.
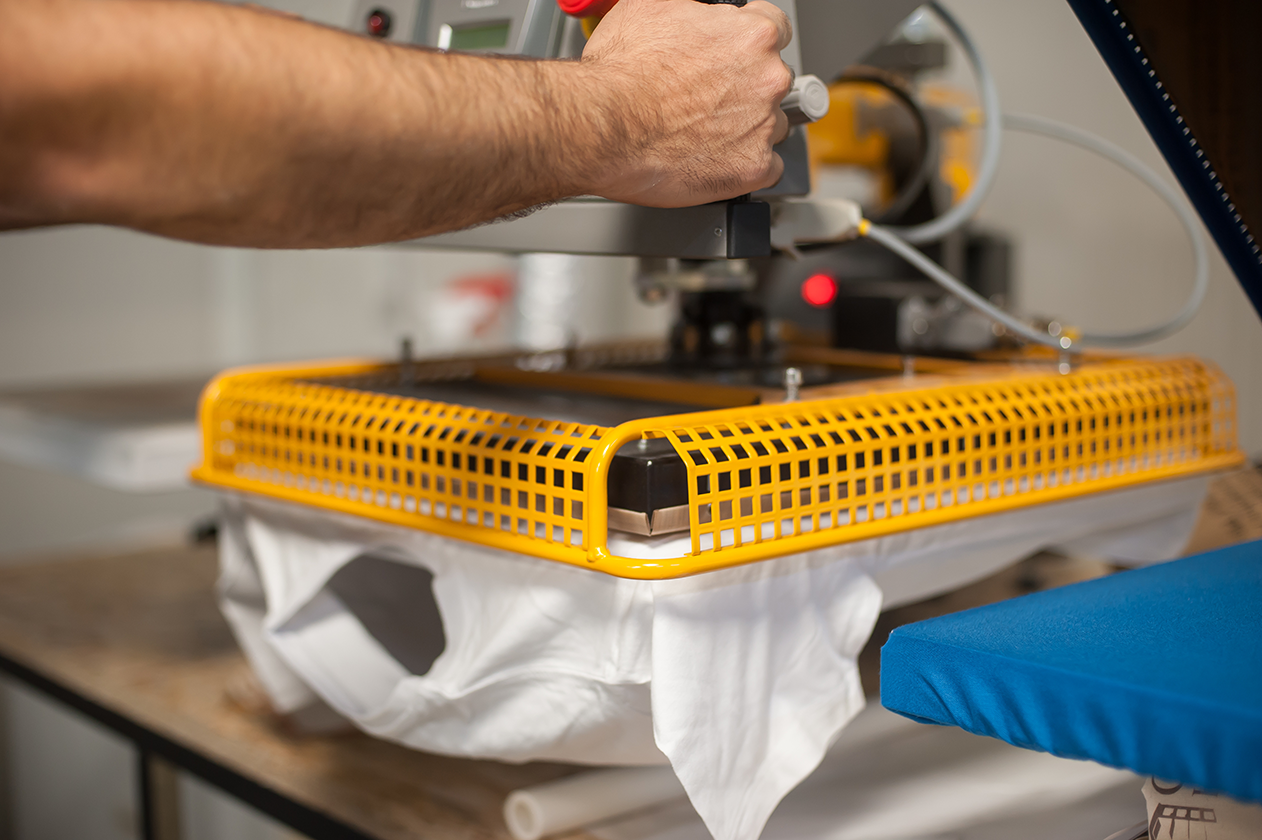
What is a Heat Press Machine?

A heat press machine utilizes heat, pressure, and time to transfer designs onto various materials, such as fabric, ceramic, or metal. Using such a machine is straightforward: It heats up before transfer, and once at an optimal temperature, you apply pressure to the material you want the design imprinted upon; you now have a printed item. Think tattooing, but without the needles. Users implement a heat press machine to create custom-printed products like apparel, promotional materials, and decor.
Why Heat Press Machines Are Essential for Custom Printing
If you want to make custom-printed products, you need a heat press machine. It's affordable, easy to use, and consistently produces stunning results. It’s so practical and competent that anyone can use it to achieve a desired outcome. Another admiral quality of printed goods, such as clothing, is that the print lasts and can even be subject to multiple washes without changing or distorting the design.
Its versatility lets you use materials like heat transfer vinyl (HTV) and inkjet transfers. These machines take up minimal space and are an excellent way to take up a hobby if you don’t want to pursue printing for commercial purposes.
Understanding the Basics of a Heat Press Machine
Before you begin custom printing your products, you must first discern the various components of a heat press and the types most individuals commonly use.
Key Components of a Heat Press Machine
A heat press machine comprises several components that function in unison to achieve a desired outcome. The platen is the heated surface; it presses the transfer material onto the substrate, typically steel or aluminum. A heating element generates the heat required to activate the transfer adhesive. A pressure adjustment control allows you to do just that: control the amount of pressure applied. A digital interface or control panel lets you set and monitor the settings you need for your transfer. And then, there’s the base, which is the part that holds the material in place and offers stability.
Different Types of Heat Press Machines
Here are the various types of heat press machines you can choose from based on your requirements:
- Clamshell Heat Press: Shaped like a clam, it has a top platen that opens and a heated platen that presses down onto the material. It’s easy to use, compact and works well in small spaces. This type is a favorite among newbies.
- Swing-away Heat Press: This model's heated platen swings away, thus allowing you to load and unload your materials safely. You can handle delicate materials practically, and its design will enable you to work with larger-sized items like sweatshirts.
- Draw Heat Press: This type works like a drawer with a slide-out platen. Perfectly positioning and removing your materials is easy with a draw heat press, mainly if you work with clothing with seams or other position-specific materials.
- Multi-function Heat Press: These heat presses do it all. You can work with various products, it has interchangeable platens and attachments and can handle a wide range of projects.
Step-by-Step Process of Using a Heat Press Machine

To successfully create custom-printed products, follow the steps mentioned below methodically:
Preparing the Heat Press Machine
If you’re new to a heat press, read the instruction manual. Ensure your heat rests on a solid surface to avoid mishaps or burns. Before using the heat press, check that all its components are functional and in place. Adjust the temperature settings based on the material you will work with.
Set the temperature to 325°F for cotton and around 300°F for polyester. Once you’ve set the required temperature, apply adequate pressure settings. Lastly, set the timer based on the type of material, as indicated.
Choosing the Right Material and Transfer Paper
Always check the manufacturer’s recommendations for various material types; they differ. Cotton works well with HTV and sublimation printing tasks. Polyester absorbs dye well, particularly for sublimation printing. Fabrics like nylon and blends also work but can sometimes be tricky. You must be extra careful when you work with a stretchy or delicate fabric.
Each type of transfer paper and vinyl is unique. HTV works well for bold or intricate designs. Use sublimation or inkjet transfer paper for photo-quality results. Adhesive-backed papers ensure a clean and smooth transfer. Always base your choice of transfer paper or vinyl on the material you use for optimal results.
Preparing the Design for Transfer
Leverage software like Adobe Photoshop or Illustrator to create your desired design at the correct size for your work material. Once you’ve completed the design process, print it on the desired transfer paper or vinyl. When you use HTV, flip the design over before you cut it to achieve the best outcome.
When you use HTV, you’ll need a paper-cutting machine like Cricut or Silhouette to cut your design. Remove the extra vinyl, and keep your desired design. Remove the tiny pieces using a pair of tweezers or a weeding tool, especially if you’re working on an intricate design. If you improperly remove the additional pieces of vinyl, you could damage your final product.
Positioning the Material on the Heat Press
If you don’t correctly position the material and design, you won’t be happy with the result; exercise caution here. Fold your fabric in half to find its center, and position it based on that center point. Correctly doing this is essential if you’re working with a larger-sized design. Keep the fabric flat, smooth, and free of wrinkles.
Use heat-resistant tape or Teflon sheets to keep your fabric in place during printing. The tape helps secure your design’s edges, and Teflon sheets act as a protective layer between the transfer and heat press platen. They also help prevent your design from sticking to the platen.
Pressing the Design Onto the Material
As mentioned, each material is unique and has a predetermined temperature and time setting; follow the instructions with the transfer material to ensure you set the desired calibrations. You can experiment with the temperature and time, but exercise caution.
Pressure is an equally important factor to account for. Insufficient pressure will result in an incomplete transfer. If you overdo it, you could mess up the design or create uneven edges. Aim to apply pressure slowly and evenly to get the best results. Also, most machines have pressure settings, so adjust them according to the thickness of your fabric.
Cooling and Peeling the Transfer
Peeling off the transfer paper is as crucial as the pressing process. A “Hot peel” is when you have to peel off the transfer paper from the material while it's still hot. A “Cold peel” is the opposite, used in sublimation transfers. Peel too early, and the design might lift; peel too late, and it might harden and become hard to remove. Attention here is crucial: leverage conveyor dryers for the best drying experience and better-quality outcomes.
Once you remove the transfer paper, examine your print. Look for cracks and peels. Your print should look vibrant and sharp and feel solid and smooth. Properly checking for a good transfer will save you time and materials due to reapplication efforts.
Common Mistakes to Avoid When Using a Heat Press Machine
Heat Press machines can overheat or underheat; these things happen sometimes. It could result in your design burning or your fabric getting scorched. At times, the transfer might not stick or peel properly. Calibrate the heat press correctly and follow the recommended temperature instructions. Use a digital thermometer if you’re unsure about or have doubts about the output temperature.
Applying the correct amount of pressure is paramount to achieving an optimal outcome. Always adjust the pressure based on the fabric’s thickness, and if your machine doesn’t have a pressure gauge, practice on a few scrap bits of cloth to better understand how pressure works.
Pre-press your fabric before you start; this is a crucial step many forget to follow. Doing this will remove wrinkles and moisture, thus giving your design the best chance of sticking to the fabric correctly.
Tips for Achieving the Best Heat-Press Results
Always use quality transfer materials if you want a long-lasting and professional-looking finish. Cheaper vinyl, HTV, or heat transfer paper will cause your designs to crack, peel, or fade after a few washes. A heat press machine is only as good as the materials you use. Invest in quality materials from reliable suppliers for the best results.
Clean your heat press machine regularly to keep it in good condition. Wipe the platen after each use to ensure no leftover materials, fibers, or adhesive. Use a non-abrasive cleaner if you find any leftover residue. Giving your machine some TLC maximizes your investment and ensures a successful heat transfer process every time.
Conclusion
A heat press machine will let you showcase your creativity, possibly start a new hobby, or expand your income sources. Knowing how the machine works and what to do if you get stuck or hit a wall will help you make better decisions on your next project. If you need quality printers, heat transfer printer materials, inks, accessories, or reliable advice on leveraging a heat press to its full potential, consult a print specialist like Allprintheads. Creating custom-printed products has never been this easy.