
Hewlett-Packard (HP) printers are one of the top printer brands in the world. With excellent print quality, user-friendly features, reliability, and speed, HP printers are a top choice for business and personal use. As with all printers, HP printheads require periodic cleaning for optimal performance.
Many HP inkjet printers include user-friendly tools in the print quality toolbox that help with routine printer maintenance and troubleshooting. If you have an HP printer, here’s a tutorial on manually cleaning the printhead to ensure the best print quality.
What is a Printhead?
A printhead is a crucial printer component that transfers ink onto paper. It consists of tiny nozzles that eject precise amounts of ink to create text and images. Printheads ensure the quality, sharpness, and color accuracy of your prints. In HP printers, printheads can be part of the ink cartridge or a separate, replaceable component. Proper printhead maintenance is essential to prevent clogs and ensure consistent performance. Regular printhead cleaning helps maintain print quality and prolongs your printer's life, avoiding the frustration and cost of frequent replacements or repairs. Clogged printheads can lead to poor-quality prints, so clean and maintain your printheads. If your printer produces streaks or inconsistent results, it might be time to clean the HP printhead using your printing preferences or manual steps.
Types of HP Printheads
HP printers feature two main types of printheads: integrated and separate. Integrated printheads are built into the ink cartridges, combining the ink supply and the printhead into a single unit. This design simplifies replacement, as you swap the entire cartridge when the ink runs out or the printhead fails. Separate printheads, on the other hand, are independent components that connect to stationary ink tanks. They can offer higher print quality and lower long-term costs, as you only replace the printhead when necessary. Understanding these types helps select the correct inkjet printer and maintain it effectively for optimal printer maintenance.
Printhead on the Printer Ink Cartridge
The printhead on the printer ink cartridge is an integrated system found in many HP printers. This design combines the printhead and ink supply into a single, replaceable unit. When you replace the ink cartridge, you also replace the printhead, ensuring fresh nozzles and consistent print quality. This type of printhead is user-friendly and simplifies maintenance, making it ideal for home and small-office use. However, it can be more expensive over time, as each ink cartridge includes a new printhead. Regular use and timely cartridge replacement help maintain optimal printer performance. Some HP inkjet printers display indicators on the printer icon or via system alerts when it’s time to clean the printhead again.
Benefits of Regular Printhead Maintenance
Keeping up with routine maintenance does more than just fix streaky prints. Here's why it matters:
- Prevents clogged printhead nozzles: Ink dries inside the printhead nozzles over time, and regular cleaning stops buildup before it becomes a full blockage.
- Extends printhead life: Consistent upkeep means fewer replacements, saving you real money in the long run.
- Maintains print quality: Every cleaning keeps colors accurate, lines sharp, and output consistent across every print job.
- Catches problems early: Using the print quality toolbox regularly helps you spot declining performance before it becomes a bigger issue.
- Reduces need for deep cleaning: Running a printer cleaning cycle routinely means you rarely need to resort to manual cleaning at all.
A few minutes of maintenance regularly is far less costly than a full printhead replacement down the line.
Cleaning Your HP Printhead: A Step-by-Step Guide
- 1. Run the auto-clean cycle: Your printer has an automatic printer cleaning cycle you can activate from your computer. To automatically clean the HP printhead, open the HP printer application, go to settings in the control panel, and choose the “Clean Print head” function. You may also select this option on your printer’s touchscreen to set the automatic cleaning process in motion. Wait until it is complete before using the printer. If the automatic method doesn’t resolve the issue, proceed with manual cleaning to thoroughly clean the printhead.
- 2. Unplug the printer from the power source: Always unplug your printer before attempting to clean the printhead. Doing so prevents electrocution and keeps the printer parts from moving while you take things apart to clean them. It’s an essential part of the manual cleaning process that ensures your safety and protects your device during printer maintenance.
- 3. Open your printer cover: Your printer should have a cover that can be lifted or opened. If you’re unsure how to open it, refer to the printer manual. If you don't have the manual, you can find a copy online using your printer model.
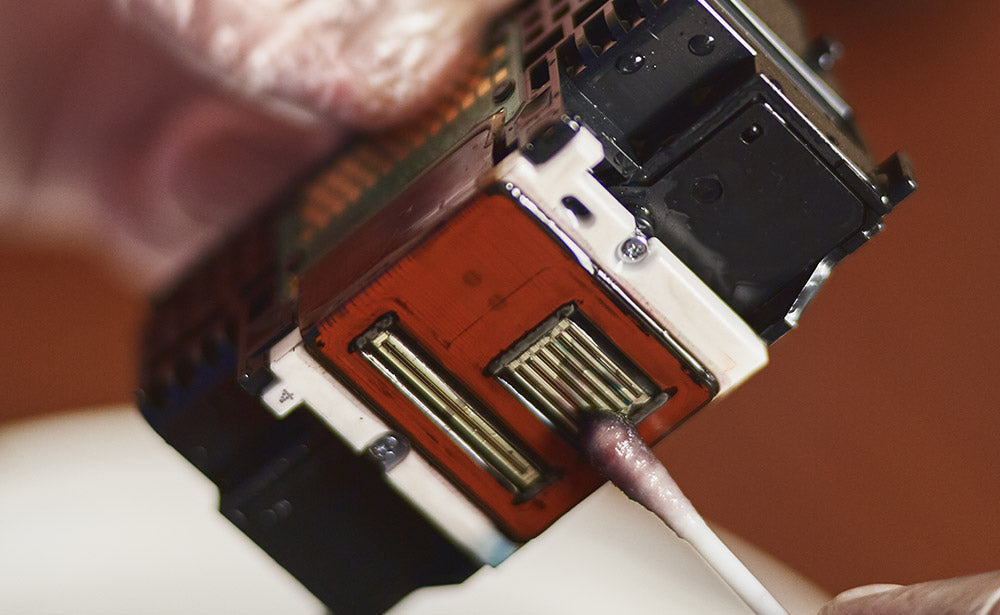
- Remove the ink cartridges and clean the contacts: Carefully remove each cartridge, then clean the printhead contact area with a lint-free cloth. The contact is where the ink cartridge connects to the printer and where the ink comes out.
- Be sure to clean each ink cartridge separately and place them back in the printer in the same place and order. Avoid using paper towels or rough fabrics; always use a lint-free cloth to prevent damage to the delicate printhead nozzles.
- 4. Clean the printhead contacts: Use a soft cloth to clean the actual printer head contacts. Dried ink can clog the printhead and cause incorrect printing, so thorough printhead cleaning is essential. Use a slightly damp, lint-free cloth to gently clean the printhead without scratching the contact surface.
- 5. Plug your printer back into the power source: Once everything is back in place, close the cover and plug your printer back into the power source. Allow the automatic startup process to run until it stops completely.
- 6. Try printing a test: Print a test paper to see if the printhead works appropriately. Assess the test print quality to determine whether you need to clean the printhead further. Use the print quality toolbox in your printer settings to assess output and decide whether to clean the printhead again.
- 7. Repeat the above steps if necessary. If the test page is still not up to the desired quality, repeat the cleaning process. After the second clean printhead routine, if you are still not satisfied with print quality, consider replacing your ink cartridges. If you still aren’t getting quality performance from your printer, consider professional assistance. For continued print quality problems, repeating the cleaning process or seeking HP support might be necessary.
Manual vs Automatic Printhead Cleaning
Now that you've seen both methods in action, here's how they compare. The automatic cleaning cycle is the easiest starting point. It runs directly from your printer settings and handles mild clogs without you needing to touch anything. Manual printhead cleaning goes deeper, physically removing dried ink from contacts and nozzles that the auto cycle can't always reach. For everyday maintenance, the automatic cycle is usually enough.
But if streaks persist after two or three automatic runs, the next step is to clean the printhead manually. Using both methods appropriately keeps your printhead nozzles clear and your output consistently sharp.
|
Automatic Cleaning |
Manual Cleaning |
|
|
Effort |
Minimal |
Moderate |
|
Best for |
Mild clogs, routine upkeep |
Persistent streaks, deep clogs |
|
Tools needed |
None |
Lint-free cloth, distilled water |
|
Time |
2-5 minutes |
15-20 minutes |
|
When to use |
First sign of quality issues |
After auto cleaning fails |
How To Know When You Need to Replace Your Printhead
If cleaning and maintaining your printer don’t resolve the problem, you may need to replace the printhead or the entire printer. Here are some signs you may need to replace your printhead.
- Cleaning is ineffective: If you’ve cleaned your printhead and still aren’t getting quality prints, or if frequent manual cleaning is required, it may be time for a replacement.
- Streaks or bands in your prints: If your output consistently shows streaks or fading, you may be dealing with deeper print quality problems despite a clean printhead.
- Your printer display says to replace the printhead: Sometimes, your printer display will tell you to replace the printhead, or an error message will appear on your computer screen.
You can verify this by checking error codes or messages in the printing preferences, or by contacting HP support directly. You can also contact HP support for advice on compatible parts for your specific model.
How Often Should You Clean an HP Printhead?
How often you clean depends on how frequently you print. Use this as your guide:
|
Usage Level |
Recommended Cleaning Frequency |
|
Daily heavy use |
Every 2 weeks |
|
Regular daily use |
Once a month |
|
Occasional use |
Every 2-3 weeks |
|
Rarely used |
Before every use |
Run a weekly test print to catch issues early using the print quality toolbox. If the results look off, start with an automatic printer cleaning cycle before moving to manual printhead cleaning. Consistency is everything; small regular maintenance always beats dealing with a stubborn clog later.
Tips to Extend the Life of Your HP Printhead
Small habits make a real difference in how long your printhead lasts:
- Print weekly: Even a simple test page keeps ink moving through the printhead nozzles and prevents drying.
- Use genuine HP ink: Third-party inks can clog nozzles more quickly and degrade print quality.
- Keep your printer dust-free: Avoid direct sunlight and temperature extremes.
- Run a printer cleaning cycle early: At the first sign of fading or streaking, don't wait.
- Power off correctly: Always use the power button to cap the printhead properly before shutting down.
Where To Buy Replacement Printheads
How can you find a suitable replacement HP printhead? If your print quality toolbox suggests repeated clean printhead actions with no improvement, it's time to replace the printhead. AllPrintheads.com has an extensive inventory of products and accessories for HP printers. You can find the part for your printer model and have it delivered to your home or business. Whether you are looking for a Deskjet, an inkjet, or an Envy HP model, you will find them all in our store.
Frequently Asked Questions
Why is my HP printer not printing anything even though it has ink?
The most common cause is a clogged printhead. Dried ink blocks the printhead nozzles even when cartridges are full. Start by running an automatic printer cleaning cycle from your HP settings. If that doesn't resolve it, follow the manual printhead cleaning steps outlined above. Persistent issues may indicate it's time to replace the printhead entirely.
How do I do a self clean on my HP printer?
Open your HP printer application, go to settings or the print quality toolbox, and select the clean printhead option. The automatic cycle runs on its own and takes just a few minutes. Print a test page afterward to check results. Repeat once more if needed before moving on to manual cleaning.
How do I clean a clogged printhead?
Start with an automatic printer cleaning cycle through your HP printer settings. If streaks persist, move to manual printhead cleaning: unplug the printer, remove cartridges, and gently clean the printhead nozzles and contacts with a lint-free cloth dampened with distilled water. Allow everything to dry fully before reassembling and running a test print.
Can a dirty printer head ruin my printer?
Yes, over time it can. Severely clogged printhead nozzles can cause permanent damage if left unaddressed, leading to failed prints and eventually a non-functioning printhead. Regular use of the printer cleaning cycle and occasional manual printhead cleaning prevents buildup from reaching that point and keeps your HP printer running reliably for longer.
Conclusion
Maintaining your HP printer's printhead is essential to ensure high-quality prints and extend its life. Regular cleaning and proper handling can prevent common issues like clogs and streaks. If cleaning doesn’t resolve print quality problems, consider replacing the printhead or seeking professional assistance. Routine printhead cleaning should be part of your regular printer maintenance schedule, especially for frequently used HP inkjet printers. If you continue to experience print quality problems, try another clean printhead cycle or contact HP support.
2 comments
Jaime
Here’s what I found regarding your HP Officejet 6700 Premium and the “Failed or Missing Printhead” error:
Printhead Integration: The printhead in the HP Officejet 6700 is not integrated into the cartridges. It is a separate component, but it is not user-removable. This means cleaning or replacing it yourself is not straightforward12.
Troubleshooting Steps:
Reset the Printer: Disconnect the power cord while the printer is on, wait for 60 seconds, and reconnect it directly to a wall outlet (not a surge protector). Turn the printer back on and check if the error persists23.
Clean Contacts: If accessible, clean the electrical contacts on the cartridges and the printhead using a lint-free cloth dampened with water4.
Replace Cartridges: Sometimes, replacing the ink cartridges with new ones can resolve the issue1.
Cleaning the Printhead: Since the printhead is non-removable, manual cleaning is limited. If the error persists after trying the above steps, it may indicate a hardware failure4.
Repair or Replace: If the issue remains unresolved, the printhead or printer hardware might need servicing. Given the age of the printer and the cost of repairs, replacing the printer could be more economical13.
Let me know if you need further assistance!
Gordon
Good day.
I have an HP Officejet 6700 Premium.Its been standing unused for about 2 years.Its showing “Failed or missing printhead.” Do I need a new printer,try to clean it and is the printhead integrated into the cartridges? Thanks.
Gordon/Johannesburg.